
Buy used phones from customers in the RepairCMS app
On this page · 13 sections
The RepairCMS app lets you buy used phones and other devices from customers on your phone or tablet. The camera reads the seller’s ID without saving a picture. The seller reads the purchase contract and signs on the screen. Then you pay out, add the device to your stock and print its label. It works on iPhone, iPad and Android.
Trade-in is included in the RepairCMS Team and Enterprise plans at no extra cost. You need the RepairCMS app version 1.8.0 or later. Cash payouts need a connected helloCash POS.
Get the app on the App Store or Google Play. To sign in, see Install the app and create an account.
Activate Trade-in
- Open “More” and tap “Apps & add-ons”.
- On the “Trade-in” card, tap “Activate”, then “Activate now”.
You’ll then find Trade-in under “More” and in the plus menu. On a computer, you turn it on under “Apps & Integrations”. It’s the same setting in both places.
Start a new trade-in
There are two ways to start.
- Tap the plus and choose “Buy a device”.
- Open “More” and tap “Trade-ins” under “Trade-in”. You can start a new trade-in from there too.
The app saves the trade-in as a draft at every step. An open draft sits at the top of the plus menu as “Continue trade-in”. You can finish a draft from the web app in the app, and the other way round.
Steps 1 to 3: Device type, device and number
- Choose the device type, for example smartphone or notebook. The app shows your business’s device types.
- Choose brand and model, and add the specs if needed.
- Scan or type the number. On a smartphone, dialling *#06# shows the IMEI. A phone with two SIM slots has two IMEIs.
The app checks the number right away. It spots a mistyped IMEI by its check digit. If the device is still in your stock, you can’t buy it. If the number was used in an earlier trade-in, the app shows that trade-in’s number and date.
Steps 4 and 5: Condition and checks
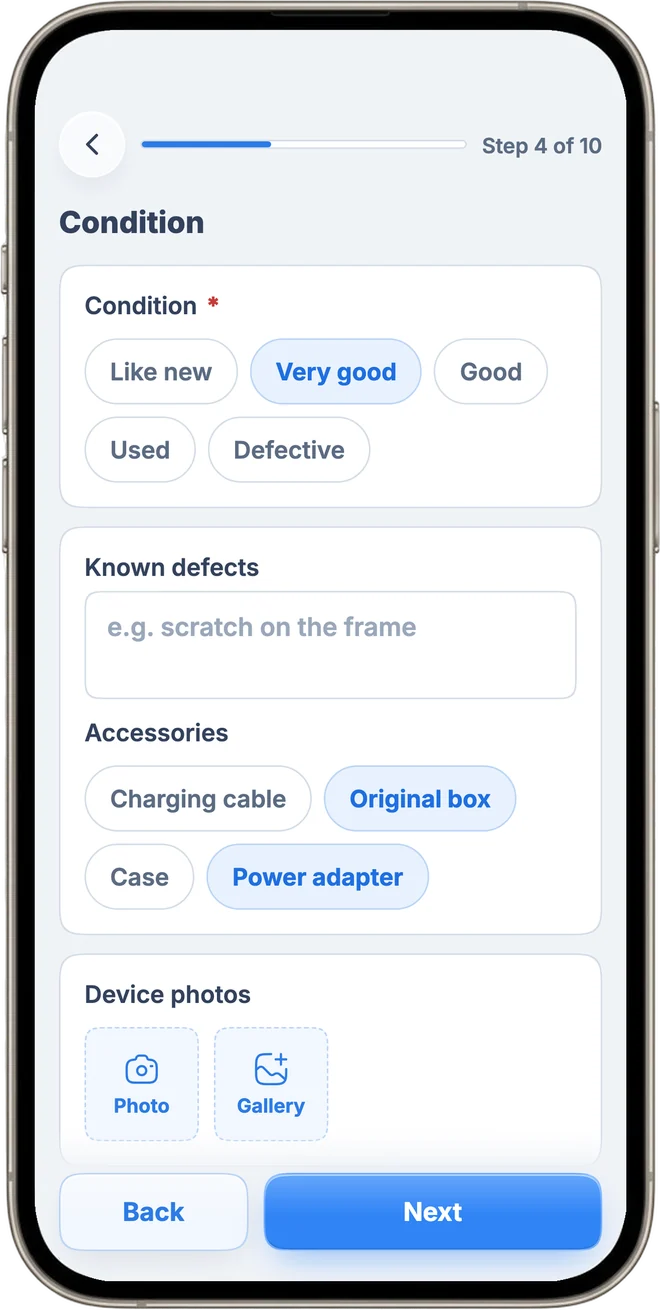
- Choose the condition from “Like new” to “Defective” and enter known defects.
- Tick the accessories and take photos of the device.
- Under “Check before buying”, tick all required checks. For a smartphone, that includes seeing for yourself that Find My or the Google account is signed out.
Step 6: Scan the ID
- Choose the ID type: ID card, passport or residence permit.
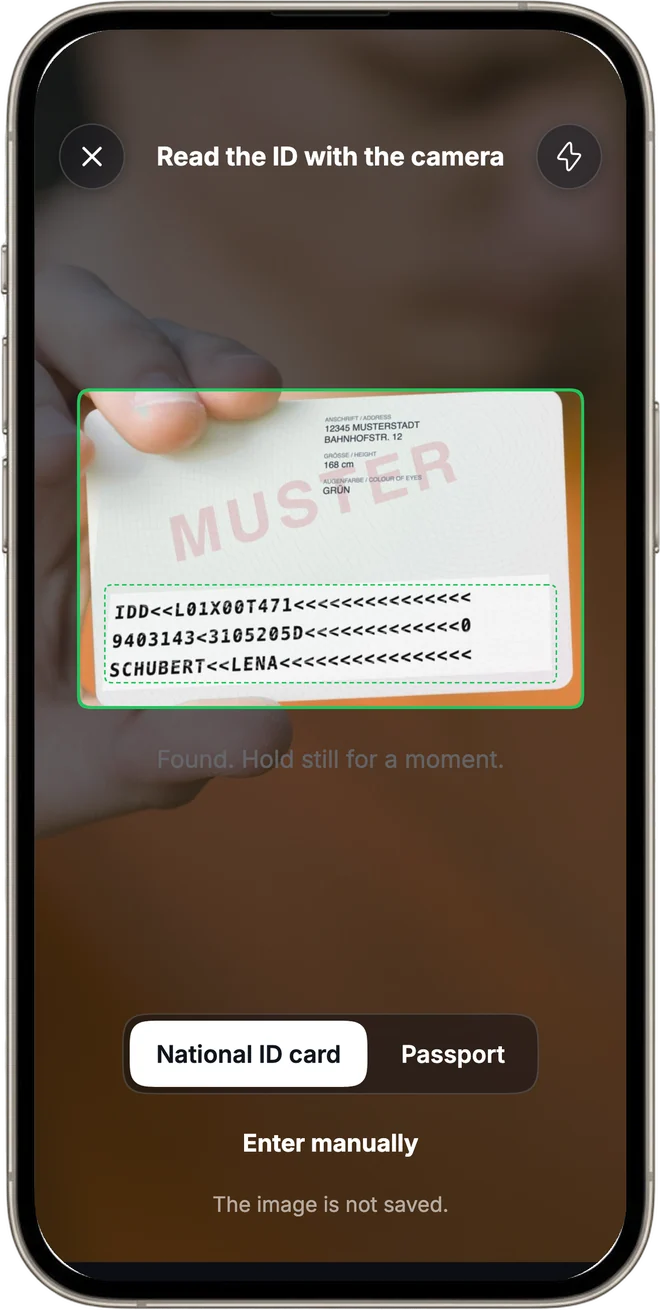
- Tap “Scan ID” and hold the ID in front of the camera so the lines with the <<< characters sit inside the frame.
- When “Found. Hold still for a moment.” appears, keep the ID still until the app has read the details.
- Compare the details with the ID.
The camera only reads the details. The app doesn’t save the picture. If scanning doesn’t work, tap “Type it in by hand”. An expired ID blocks the trade-in.
The ID number only appears in the purchase contract. It isn’t a search field and isn’t part of the export for your tax advisor.
Step 7: Seller
- Find the seller or create a new one.
- Check the address and birth date. The seller must be at least 18.
- Choose what they sell as: private person, small business or business under the margin scheme.
If the name or birth date differs from the ID, the app asks you about it. If the seller is a business that charges VAT, the trade-in stops here. That purchase needs an invoice from the seller.
Steps 8 and 9: Price and payout
- Enter the purchase price. It doesn’t include VAT.
- Choose “Bank transfer” or “Cash from the register”.
You make the bank transfer yourself, and a connected register stays unchanged. Cash only works with a connected helloCash POS. The app then shows how much cash is in the register and how much is left afterwards, and books the payout as a withdrawal. If there isn’t enough cash, choose a bank transfer. To connect the register, see Set up helloCash POS.
For cash payouts of €10,000 or more, the app asks you to confirm, because money laundering rules apply. For precious metals, this starts at €2,000.
Step 10: Read and sign the purchase contract
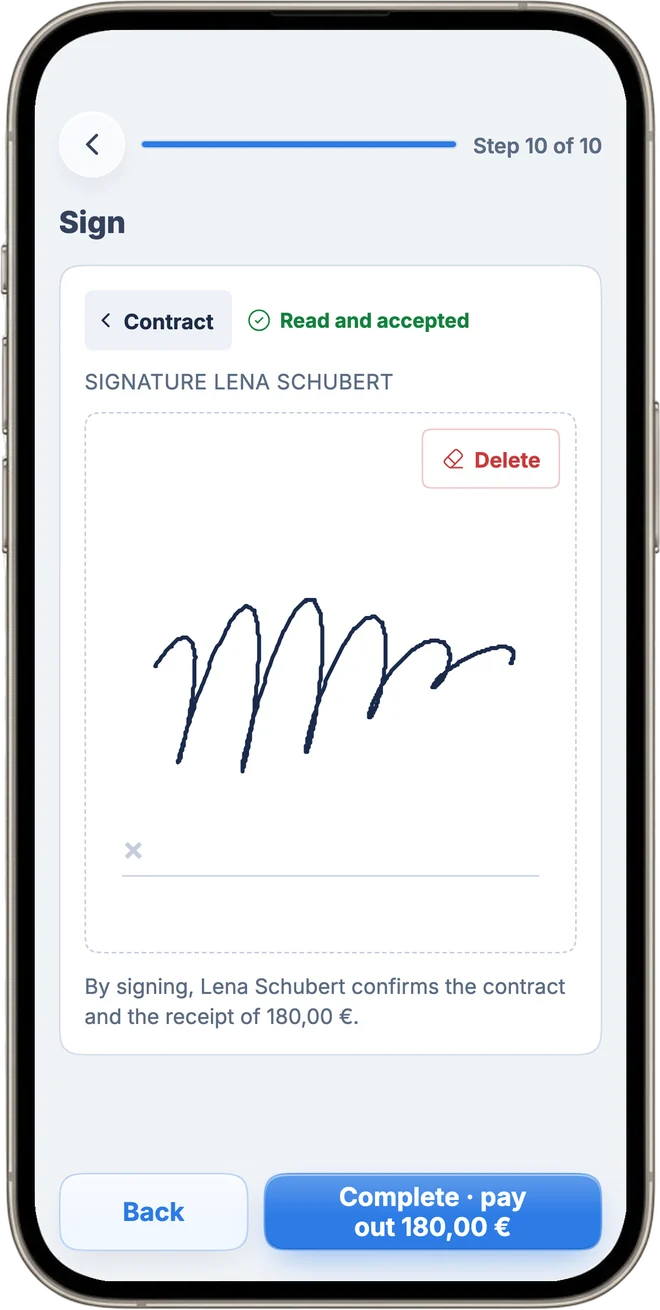
- Hand your phone or tablet to the seller. They read the purchase contract to the end.
- They tap “Accept and sign” and sign with a finger or a pen.
- Tap “Complete trade-in”.
The contract contains your company details, the seller, the device with its number, condition and accessories, the price and the payout. The text is a template from RepairCMS. You’re responsible for the contract with your sellers, so check it for your business before you use it.
After completing: store the device and print the label
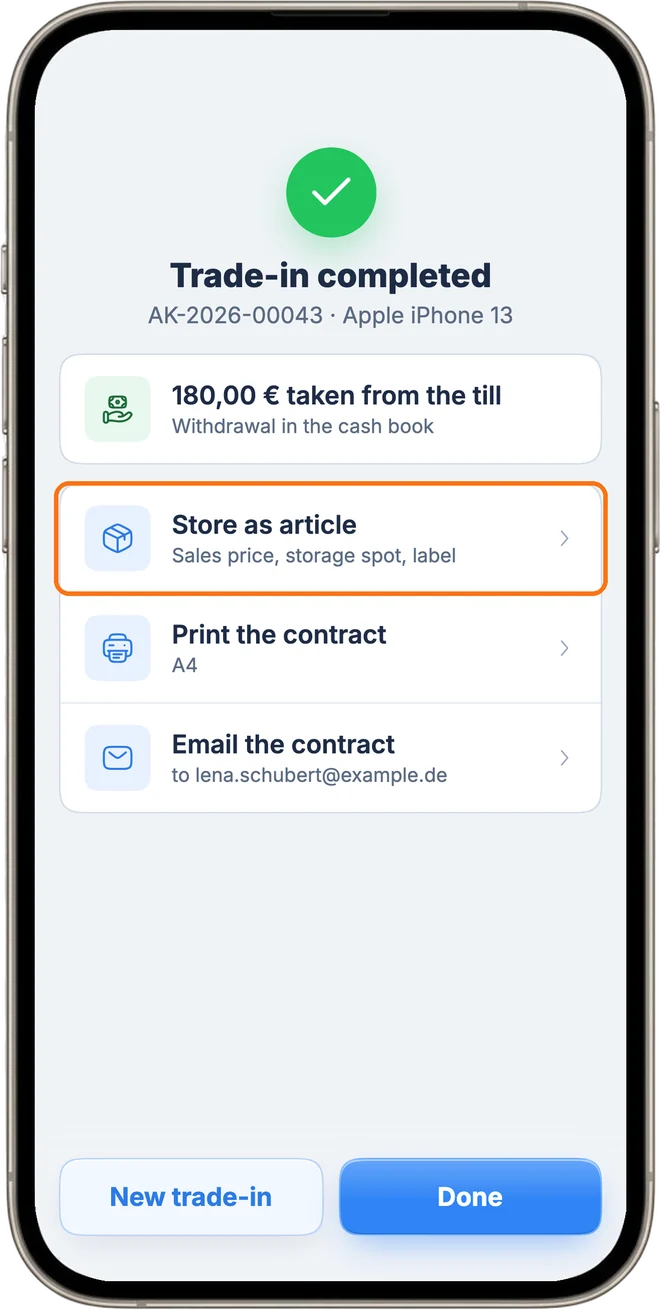
When the trade-in is complete, you see “Trade-in completed” and the payout.
- Tap “Store as article”.
- Enter the sale price and choose the storage place. The app shows the margin, the only part that carries VAT.
- Keep “Print article label” ticked and tap “Store and print label”.
The label shows the barcode, sale price and IMEI or serial number. To connect a printer, see Connect a printer.
Print the contract as A4 with “Print the contract”, or send it to the seller with “Email the contract”. As the owner or an admin, you choose between the copy for your shop with the full ID number and the seller’s copy with the number shortened.
Find and export trade-ins
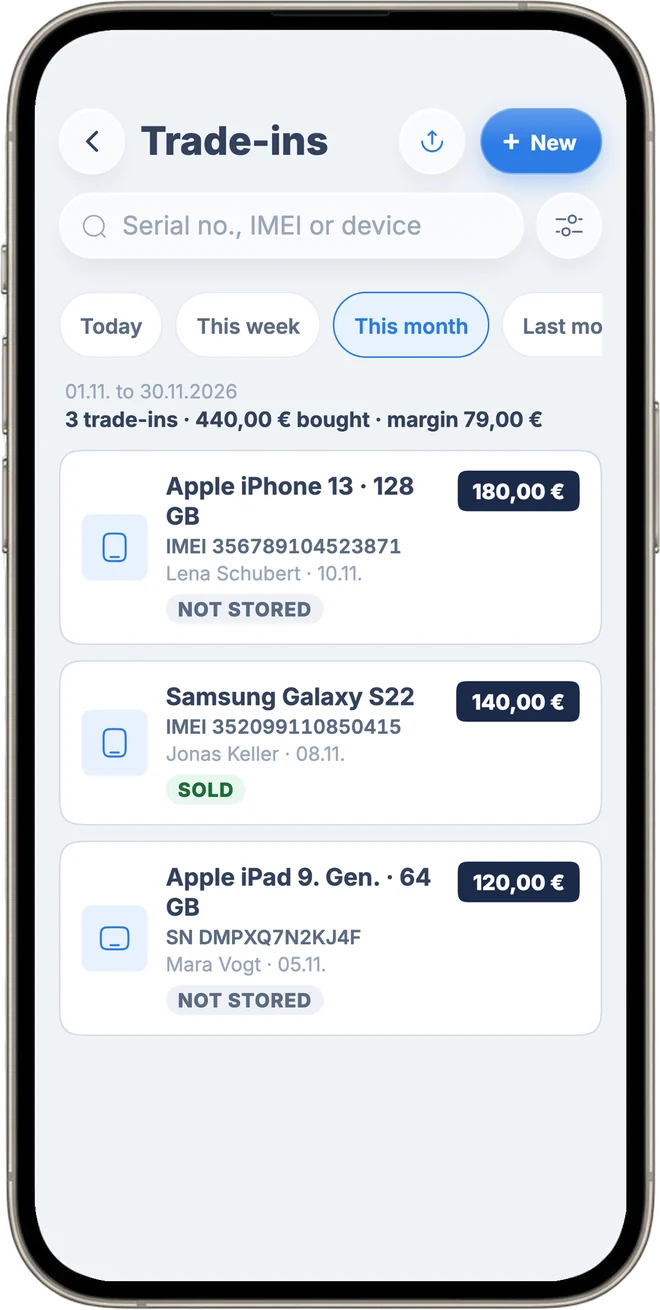
Open “More” and tap “Trade-ins”. The list shows all trade-ins with the count, purchase total and margin.
- Search by serial number, IMEI or device. The search covers all periods.
- Filter by period and by “Stored”, “Not stored” or “Sold”.
- Tap “Export”, choose a profile and then “Print”, “CSV” or “Excel”. The export follows your filter. The “Tax advisor” profile leaves out sellers and ID details. The “Complete” profile includes the seller but no ID number, and only the owner can use it.
Cancel a trade-in or correct the price
A completed trade-in can’t be edited or deleted in the app. As the owner or an admin, open it, tap “…” at the top and then “Correction”.
- “Cancel trade-in”: You enter a reason. The contract stays saved and the device leaves your stock. If the seller gives the cash back, use “Reverse the old payout” to book it back into the register as a deposit.
- “Correct the price”: The app cancels the trade-in and starts a new one with all details. You enter the correct price, the seller signs again and the trade-in gets a new number.
Once the device is sold, the trade-in can no longer be cancelled.
What’s next
On a computer, you buy devices the same way, except that you type in the ID details. See Activate trade-in in RepairCMS and buy devices.
Frequently Asked Questions
Why should I check the seller's ID when buying a used phone?
The ID records who sold you the device. If it later turns out that a device was stolen, you can show who sold it to you. The RepairCMS app reads the ID details with the camera and puts them into the purchase contract.
Does the app store a photo of the ID?
No. The camera only reads the lines with the <<< characters, and the app doesn't save a picture. The ID number only appears in the purchase contract, not in the export for your tax advisor.
Can I pay the seller in cash?
Yes, if a helloCash POS is connected. RepairCMS then books the payout as a withdrawal in the cash book. Without a register, you pay by bank transfer.
What happens if the IMEI is already in my stock?
The RepairCMS app stops the trade-in, because RepairCMS still has the device in your stock. Check the article in your stock and the number you entered.
Did this guide help you?