
Set up customer SMS with seven.io
On this page · 11 sections
With the SMS app, RepairCMS sends your customers a text message when you create a job, change its status or complete the repair. The SMS comes on top of the email your customer already gets, and the tracking link inside it shows them right away where their repair stands. For this you connect your own seven.io account once, and seven.io bills the messages directly to you. You decide which SMS go out, all of them start switched off. You can also write a single SMS straight from a job.
What you need
Available provider: seven.io
- A seven.io account with credit. seven.io bills every SMS directly to you, not through RepairCMS.
- The SMS app itself, which is included in every RepairCMS plan.
- Your customers’ consent to receive SMS from your business. That responsibility is yours.
- A mobile number on the customer. RepairCMS doesn’t send SMS to landlines, and the log shows you those cases.
Get an API key in seven.io
RepairCMS connects to your seven.io account with an API key. It’s a long string of characters that lets RepairCMS send SMS on your behalf.
- Sign in to seven.io and open the Developer area of the dashboard.
- Create a new API key with SMS permission and set the environment to “Live”.
- Copy the key.
The key has to be set to “Live”. With a Sandbox key seven.io doesn’t deliver any SMS, and the environment of an existing key can’t be changed. If RepairCMS spots a Sandbox key, it shows “Sandbox key detected”. In that case you create a new key with the environment Live in seven.io and paste it in with “Paste live key”.
Connect the SMS app to seven.io
- Click “Apps” in the sidebar and open the “SMS” tile.
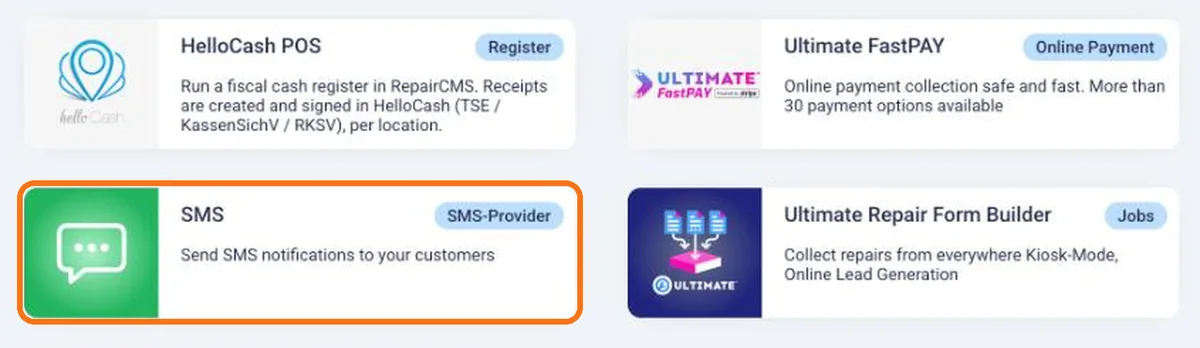
- Click “Connect” at the top right. Step 1 of 2, “Connect seven.io”, opens.
- Paste your key into the “API key” field. “Get your key” repeats the three steps in seven.io if you need them.
- Under “Sender (optional)”, enter the name your customers should see above the SMS, your business name for example. Up to 11 characters are allowed. You can change the sender in the settings at any time.
- Click “Connect and verify”. RepairCMS checks the key with seven.io and shows “SMS provider connected”.
If RepairCMS shows “seven.io rejected this API key”, check that you copied it completely and paste it again. If it says “seven.io could not be reached”, try again in a few minutes.
Set up delivery reports (optional)
Without delivery reports, the log shows that seven.io accepted your SMS. With them, it also shows whether the SMS reached your customer. To get them, you add a webhook in seven.io, which is an address seven.io sends the report to after every SMS.
After connecting, RepairCMS shows Step 2 of 2 (optional), “Delivery reports”.
- In seven.io, open Webhooks.
- Add a webhook for the dlr event with the request format JSON.
- In RepairCMS, copy the two values with “Copy webhook URL” and “Copy header”, then enter them for the webhook in seven.io.
- In RepairCMS, click “Verify webhook”. RepairCMS sends one real SMS for this, billed to your seven.io account. If everything works, you see “The webhook works.”
“Skip for now” leaves this step out. You can catch up at any time in the “Settings” tab under “Delivery reports” with “Set up”.
The header belongs to your account only. Don’t share it.
Set the sender and confirm consent
Once connected, the app page has four tabs: “Description”, “Settings”, “Messages” and “Logs”. At the top of the “Settings” tab you see your seven.io connection with the last characters of your API key and your current balance. Below that you decide who the SMS comes from and confirm your customers’ consent.
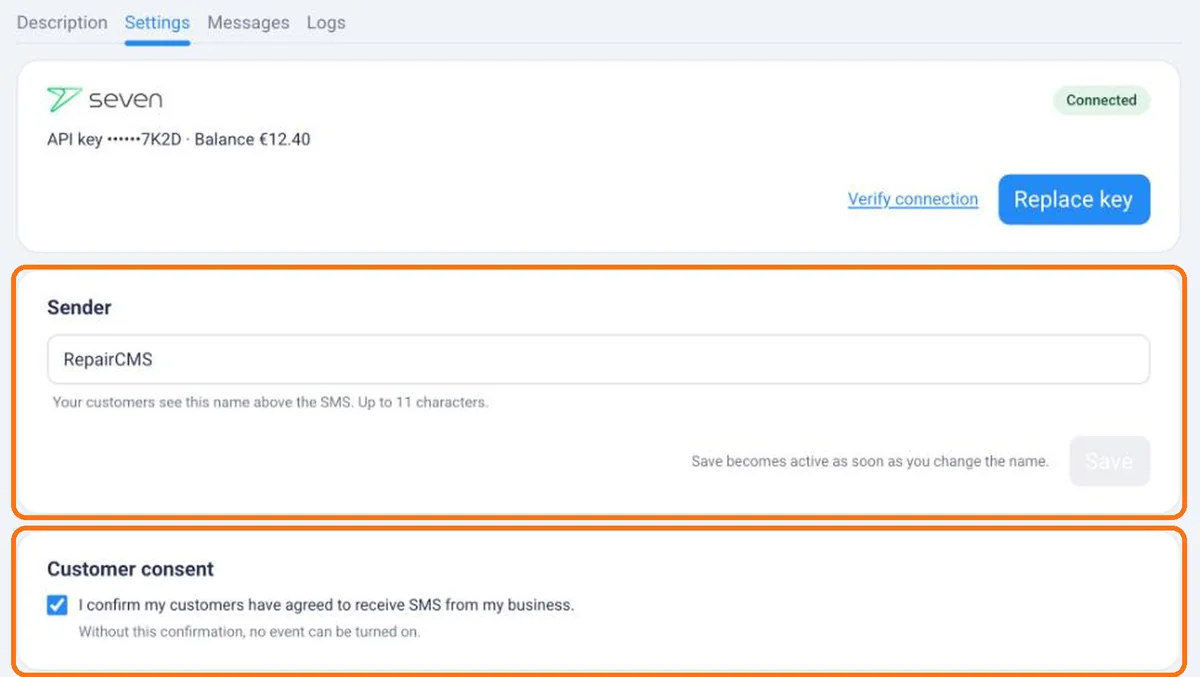
- Under “Sender”, enter the name your customers see above the SMS. Letters and digits up to 11 characters are allowed, or a phone number with +, such as your business number.
- Click “Save”. The button becomes active as soon as you change the name, and RepairCMS then shows “Sender saved”.
- Under “Customer consent”, tick “I confirm my customers have agreed to receive SMS from my business.” Only then can you switch SMS on.
If you enter a phone number as the sender, your customer can reply to the SMS and the reply goes to the phone with that number. Replies never come back into RepairCMS. A customer can’t reply to a sender name.
Switch SMS on and edit the texts
On the left of the “Messages” tab you see the three moments when RepairCMS sends your customer an SMS. On the right is a phone showing the preview as your customer gets it, with your sender at the top.
- 1. New job confirmation goes out as soon as you create a new job for the customer.
- 2. Job status change goes out when the job status changes.
- 3. Repair complete goes out when you complete the job.

To switch an SMS on and edit its text:
- Turn on the switch on the right of the row. While it’s off, the preview shows “… is off. This SMS is not sent.”
- Click the row. The “Text for …” field opens below with the RepairCMS default text.
- Change the text the way you want it. “+ First name”, “+ Job no.”, “+ IMEI”, “+ Company name” and “+ Tracking link” insert placeholders that RepairCMS fills with each customer’s details. The tracking link opens the page where your customer sees where their repair stands.
- Click “Save”.
A counter below the text shows roughly how long the SMS will be, for example “approx. 139 characters, 1 SMS”. If the text doesn’t fit into one SMS, RepairCMS tells you how many SMS it will be billed as. “Reset to default” brings back the original text. If you switch to another row without saving, RepairCMS asks “Save changes?”.
If the consent box isn’t ticked yet, the tab shows a notice at the top. “Go to Settings” takes you straight there.
“Test to me” sends you the text as a test SMS before your first customer gets it. Once it’s out, RepairCMS shows “SMS sent”.
Send a single SMS from a job
Not every message fits a template, for example when you want to tell your customer they can pick up their iPhone today from 2 pm. For moments like that you write them your own SMS straight from the job, as soon as the SMS app is connected.
- Open the job and go to the “Communication” tab.
- On the left under “inbox”, click “SMS”. At the top you see your customer’s mobile number with the line “All messages are sent as SMS to …”.
- Type your message into the “Write an SMS to this customer” field. Below it, RepairCMS counts characters and segments, for example “66 characters · Segments: 1/4”. One segment is one SMS, and a message can be up to four of them long.
- Click the green send button. RepairCMS shows “SMS sent to the customer”, and the SMS appears in the thread as a green bubble “SMS to …”.
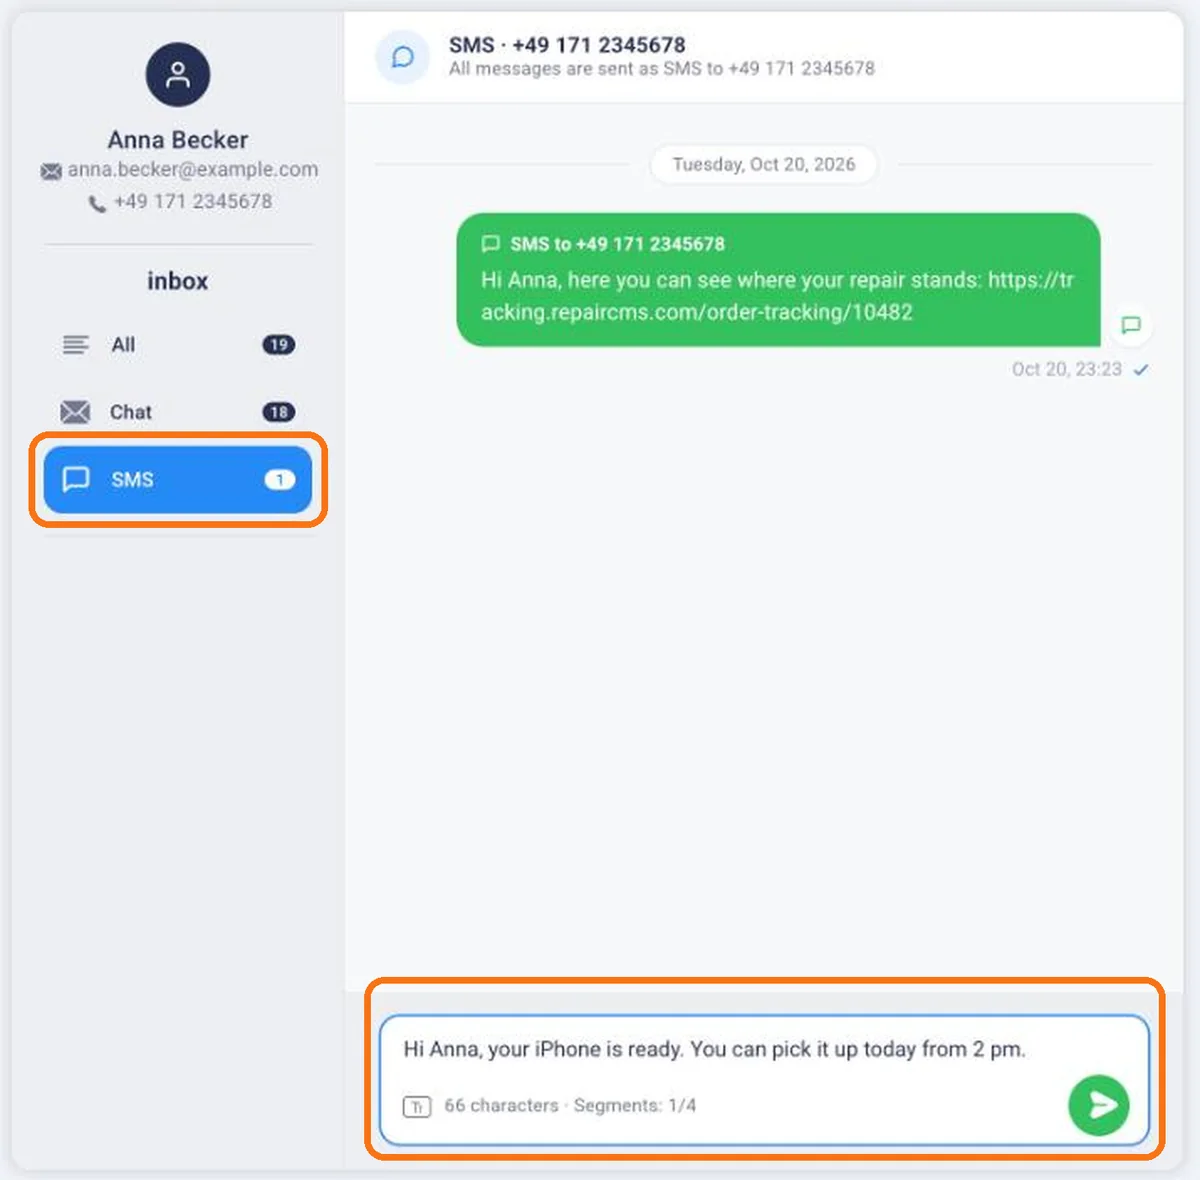
The SMS goes straight to your customer’s mobile number and is billed to your seven.io account. In the log it shows up as “Manual message”.
Check the log to see what went out
The “Logs” tab lists every SMS with time, job, recipient, event, result, number of SMS and reason. You can search by job number or mobile number and filter by date range, event and result. The history is kept and isn’t deleted automatically.
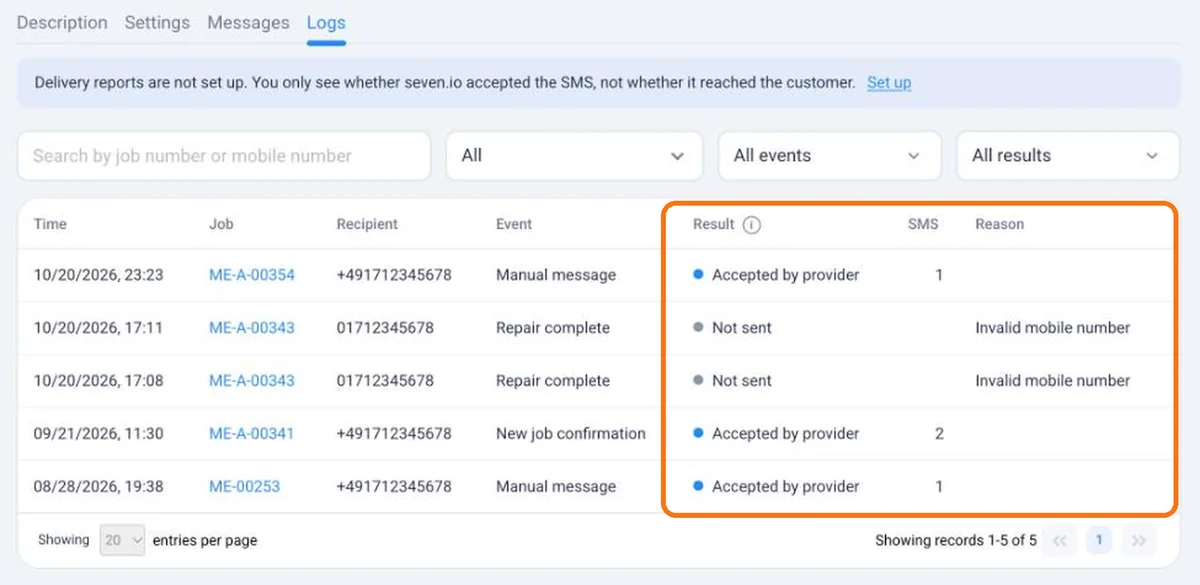
The “Result” column tells you what happened to the SMS:
- Delivered means the SMS arrived on your customer’s phone.
- Accepted by provider means seven.io received the SMS. Only delivery reports show whether your customer got it. If they aren’t set up, the tab points this out at the top.
- Not delivered means seven.io couldn’t deliver the SMS.
- Rejected means seven.io didn’t accept the SMS.
- Not sent means RepairCMS didn’t send the SMS out. The “Reason” column says why.
Possible reasons are “No mobile number on the customer”, “Invalid mobile number”, “Not a mobile number” for a landline, “Event switched off”, “Template is empty” and “No active SMS connection”. Usually it’s enough to correct the number on the customer or to switch the SMS on in the “Messages” tab.
Replace the API key or disconnect
To store a new API key, go to the “Settings” tab and click “Replace key”. Paste it under “New API key” and click “Verify and save”. RepairCMS checks the new key before saving it and shows “API key replaced”. “Verify connection” tells you at any time whether the connection works.
If you no longer need SMS, click “Disconnect” at the top right and confirm the “Disconnect SMS” prompt. RepairCMS deletes your stored API key and no further SMS go out, including from the RepairCMS app. Your texts are kept in case you connect again later.
SMS from the RepairCMS app
The RepairCMS app sends over the same connection and for the same three events. What you switch on in the “Messages” tab therefore also decides which SMS switches the app offers when you book a job, change a status or complete a job. How to pick the sender ID there and send an SMS is explained in the article on sending SMS from a job in the RepairCMS app. You can find an overview of the feature on the seven.io SMS integration page.
Frequently Asked Questions
What does an SMS cost and who pays for it?
seven.io bills every SMS directly to your credit there, not through RepairCMS. Your remaining balance shows in RepairCMS in the “Settings” tab. The SMS app itself is included in every RepairCMS plan. If a text is longer than one SMS, it counts as several, and the counter below the text shows you this beforehand.
Why didn't my customer get an SMS?
The “Logs” tab shows the result of every SMS and, for “Not sent”, the reason too, for example a missing mobile number, a landline or an SMS that's switched off. If it says “Invalid mobile number”, check the number on the customer and save it with the country code, such as +49 171 2345678. If it says “Accepted by provider”, seven.io received the SMS, and only delivery reports show whether it reached your customer.
Can my customer reply to the SMS?
You get replies when your SMS come from a phone number. Enter your business number with + under “Sender” in the “Settings” tab, and replies go straight to the phone with that number. Replies never come back into RepairCMS, including the “Communication” tab on the job. That's why a single SMS on the job carries the note “They cannot reply to it”. A customer can't reply to a sender name such as your business name at all.
Which sender does my customer see?
The name or phone number you enter under “Sender” in the “Settings” tab. A name has up to 11 letters and digits, a phone number starts with +. In the “Messages” tab, the phone preview shows how the sender looks to your customer.
Can an SMS go to a landline?
SMS go to mobile numbers. If the customer only has a landline saved, RepairCMS doesn't send an SMS and records the reason “Not a mobile number” in the log. Add a mobile number to the customer and they get the next SMS.
Do I need my customers' consent?
Yes, and that responsibility is yours. RepairCMS asks for your confirmation under “Customer consent” in the “Settings” tab before you can switch on the first SMS.
Why does the log only ever say “Accepted by provider”?
That means delivery reports aren't set up yet. With them, the log shows whether an SMS reached your customer. You set them up in the “Settings” tab under “Delivery reports” with “Set up”, and the steps are further up in this article.
Can I send SMS from the RepairCMS app as well?
Yes, the app sends over the same connection once you've connected seven.io on the web. When you book a job, change a status or complete a job, you tap the SMS switch, and you write a single SMS from the job chat. seven.io bills every SMS, including those from the app, to the same account.
Did this guide help you?