
Edit the steps of your form
On this page · 10 sections
A form is made of steps, from the start screen to the thank you page. In the editor you add new steps under “Steps”, drag them into the right order and decide which details are required. You change titles, questions and buttons right in the preview. RepairCMS saves every change as a draft.
The Ultimate Repair Form Builder is included in the RepairCMS Team and Enterprise plans at no extra cost.
The editor at a glance
On the left you see the preview of your form, on the right the sidebar with the tabs “Steps”, “Design” and “Settings”. In the “As widget” view, a “Widget” tab is added. At the top in the middle you switch between “Edit”, “Share” and “Analytics”.
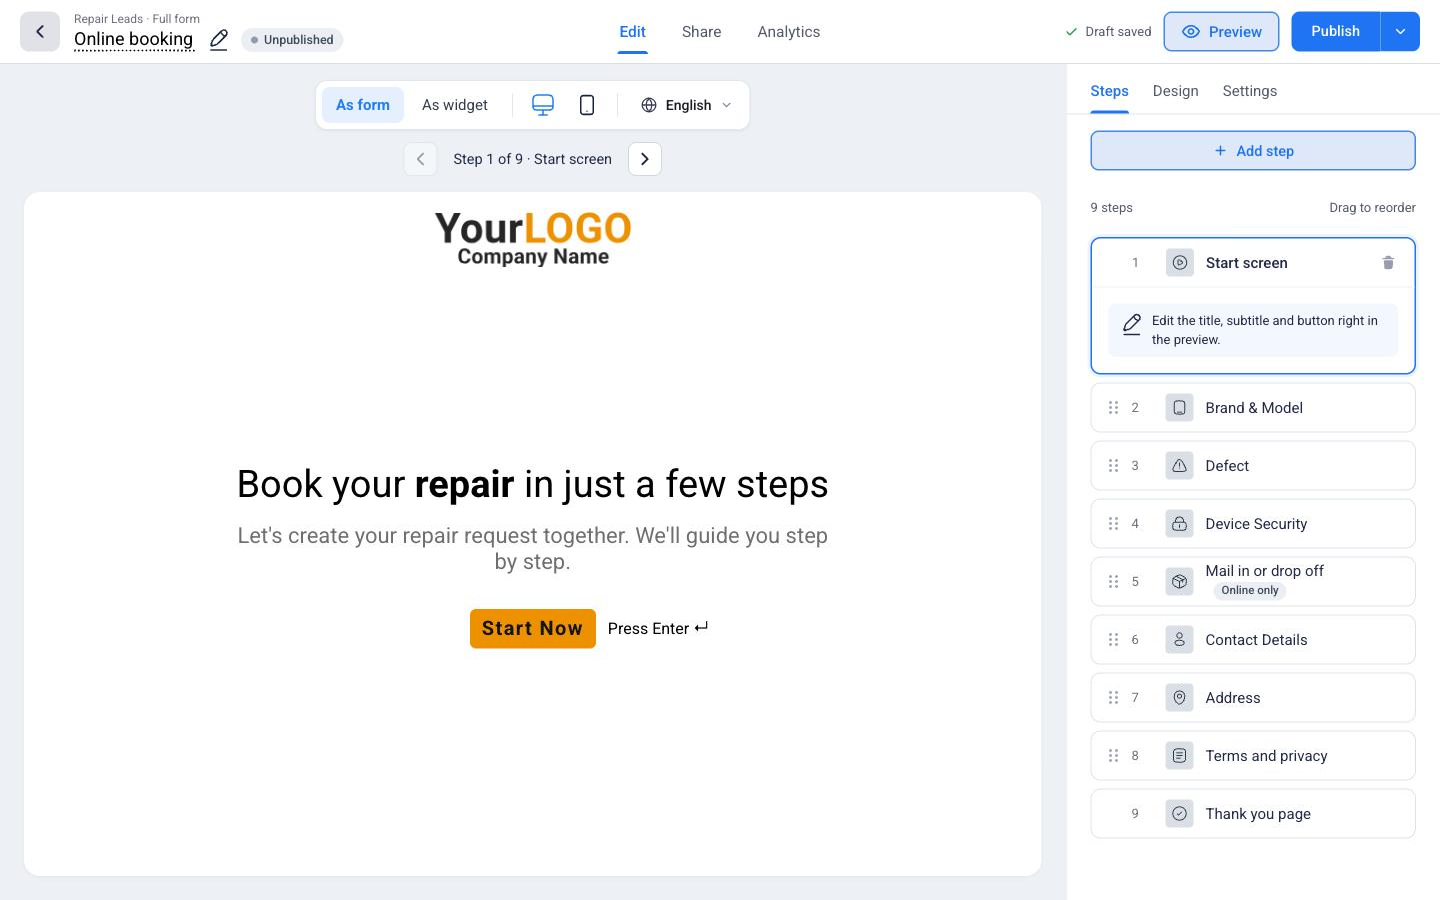
Above the preview you’ll find a bar with these buttons.
| Button | What it does |
|---|---|
| As form / As widget | Shows the form, or the price search on a sample page. “As widget” is only available for repair leads. |
| Computer and phone | Shows the preview in computer or phone size. |
| Language | Switches the language of the preview. You edit the texts for each language separately. |
| Arrows | Move through the form step by step. |
Edit texts right in the preview
- Click a step on the right under “Steps”. The preview jumps to that step.
- In the preview, click the text you want to change, for example the title or the button.
- Type your text. The change is saved as a draft right away.
For each step the sidebar tells you which texts you can change there, such as title, subtitle, placeholder and button.
Switch the language in the bar and check every step once in each language you offer.
Add a step
- Click “Add step” under “Steps”.
- Pick a step. One click adds it in the right place.
The steps are sorted into groups.
| Group | Steps |
|---|---|
| Prices and add-on sales | Price search, Add-on services, Add-on items |
| Device details | IMEI, Serial number, Purchase date, Original invoice number, Photos |
| Basic steps | for example Signature |
| More steps | Print, only in kiosk mode and service agent mode |
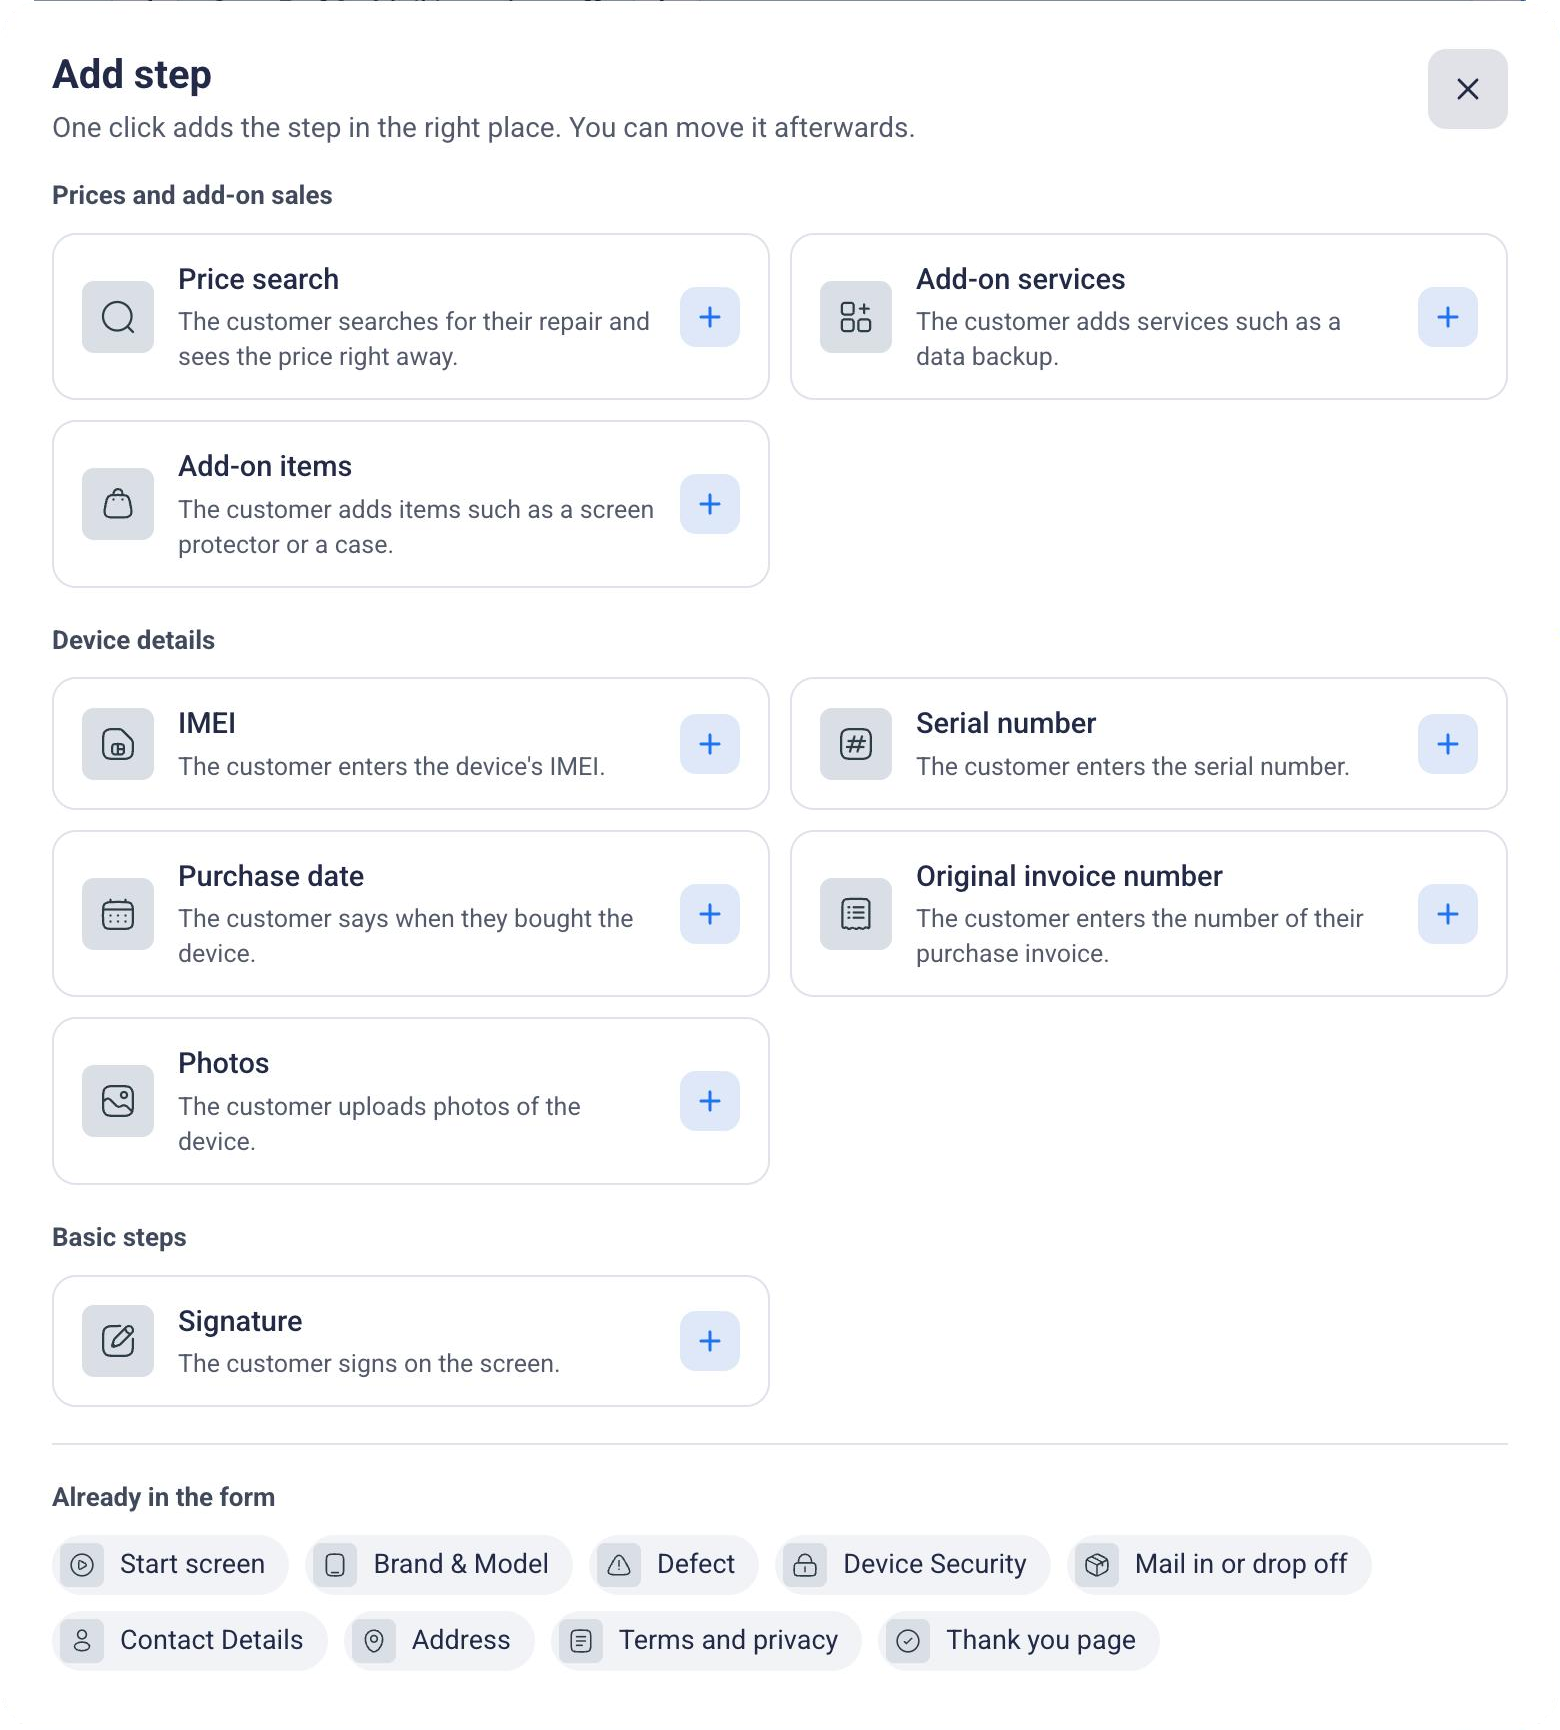
At the bottom, “Already in the form” shows which steps your form already has. Which steps are offered depends on the form type.
Change the order
Grab a step by the handle on the left and drag it to its new place. A few positions are fixed.
- The start screen is always first, the thank you page always last.
- Device details such as IMEI, serial number, purchase date, original invoice number and photos always come before the signature.
Set required details
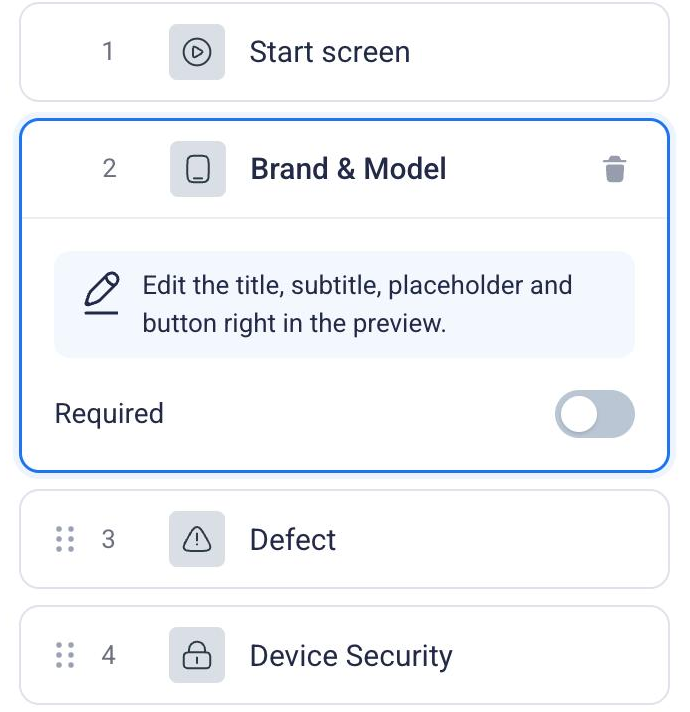
Open a step. If it has a “Required” switch, use it to decide whether the customer has to fill in this step. With the switch off, the detail is optional. For “Contact Details” and “Address” you set this for each field separately.
Remove a step
- Open the step and click the trash icon.
- Confirm with “Remove”.
This deletes the texts and settings of that step.
You don’t remove the thank you page, you hide it with the eye icon. “Show again” brings it back.
The thank you page
Under “What customers see at the end” you choose what appears after the booking.
- QR code: Customers show the code when they drop off their device on site.
- Confirmation: Customers see their documents and your links.
“Show Done button” shows or hides a button at the end. Service agent forms have no thank you page.
Mail in or drop off
For repair leads and for RMA and warranty, the “Mail in or drop off” step asks the customer how the device gets to you. It carries the label “Online only” because bookings on site don’t need it. Under “Hand-in methods” you switch three methods on or off. The customer picks one, and at least one stays on.
| Hand-in method | What you set |
|---|---|
| Drop off | Under “Drop-off locations” you set where the customer hands in the device. Add more with “+ Add location”. |
| Mail in | Under “Customers send to” you set the address the device goes to, plus the “Shipping label”. |
| Pick up | RepairCMS only notes the pickup on the request. There is no label and no appointment, you contact the customer yourself. |
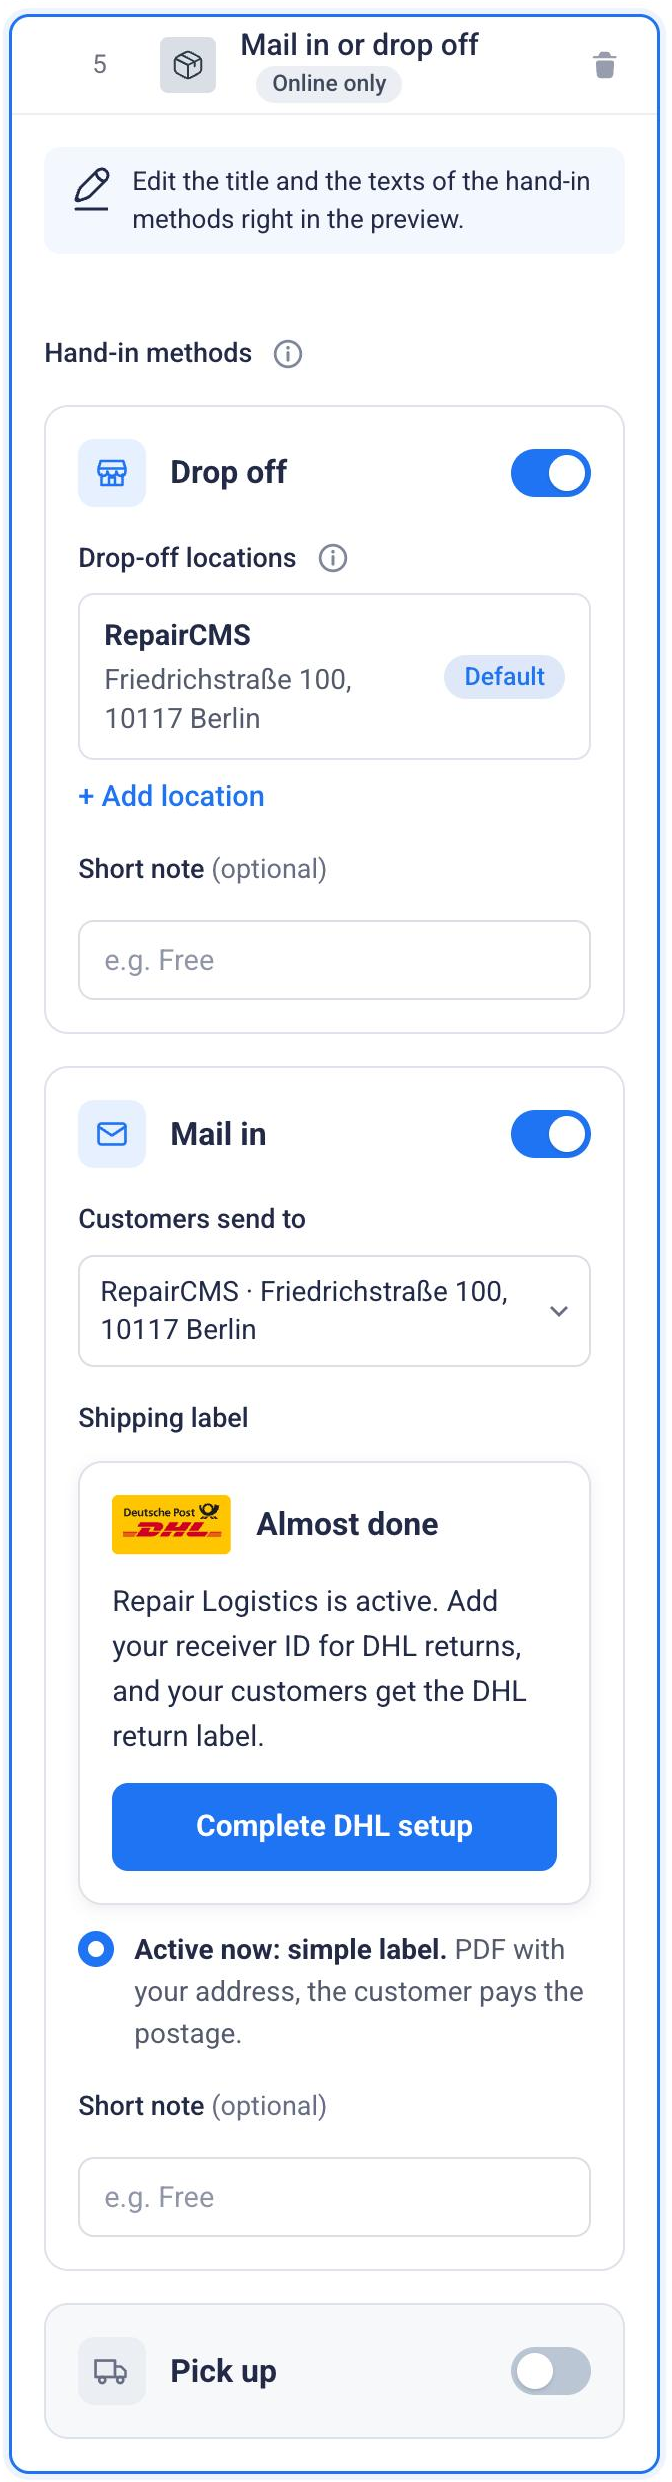
For each method you can add a “Short note”, for example “Free shipping”.
Shipping label for mail in
- Simple label: The customer gets a PDF with your address and pays the postage themselves. No setup needed.
- DHL return label: The customer gets a prepaid label by email and pays nothing. You pay the postage through your own DHL contract. Under “Create label” you choose “Right after the booking” or “After my approval”. If the label is created right after the booking, the customer also gets a QR code and does not need to print anything at the DHL drop-off point. “Maximum DHL labels per day” sets a limit. Once it’s reached, the customer gets the simple label.
The DHL return label needs the Repair Logistics add-on and a completed DHL setup. The form’s booking location must be in Germany. If Repair Logistics or the DHL setup is missing, the editor shows “Complete DHL setup”, and your customers get the simple label until then. If the location is outside Germany, the editor tells you so, and your customers always get the simple label. To find your DHL credentials, see Where do I find my DHL credentials?.
Print on site
With the “Print” step you print the receipt and label on site after the booking. In service agent mode it is already included. In kiosk mode you add it with “Add step” under “More steps”. After the booking, a preview opens with the job receipt and device label.
Frequently Asked Questions
Why can't I drag a step to the end?
A few positions are fixed. The thank you page is always last, and device details such as serial number or photos always come before the signature.
Where do I change the question or button text of a step?
Right in the preview. Click the step in the sidebar, then click the text in the preview and type your own.
What does the DHL return label cost my customers?
Nothing. The label arrives prepaid by email. You pay the postage through your own DHL contract. For this you need the Repair Logistics add-on.
Why do my customers get the simple label even though I chose DHL?
This happens when the DHL setup isn't complete, the booking location isn't in Germany, or the daily maximum has been reached. In the “Mail in or drop off” step the editor shows what is missing.
Did this guide help you?