
Set up and print job labels in the web app
On this page · 8 sections
In the web app you set up your job label under “Settings”, “Labels”: size, orientation, font, barcode and which details appear on it, such as job ID, customer name or storage location. “Test print” lets you check the result and “Save” applies it. You print from the job list through the three-dot menu and “Print Label”.
The label settings page currently shows German labels even in the English interface. The German label is given in brackets.
What the job label is for
The job label sticks to the device during the repair and links it to its job. Whether it’s a coffee machine, a laptop or a wristwatch, the label shows what your team needs to know at the bench. You decide what that is in the settings.
Step by step: set up the label
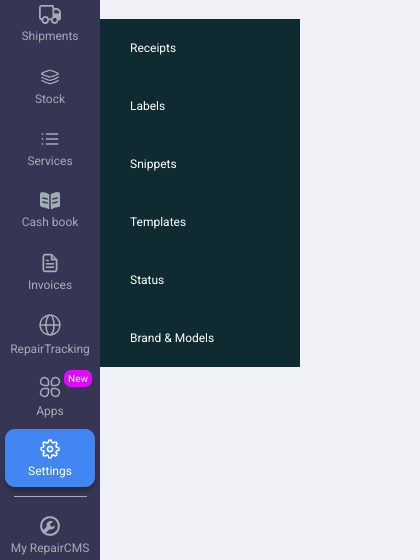
- Click “Settings” in the sidebar. A menu opens with Receipts, Labels, Snippets, Templates, Status and Brand & Models.
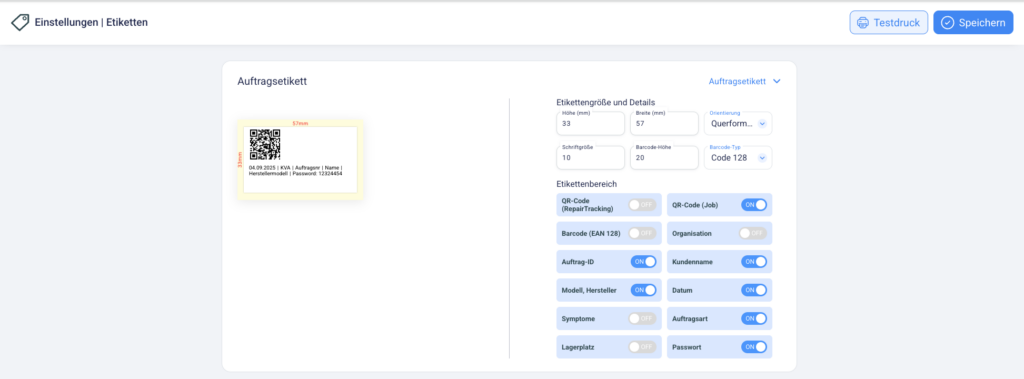
- Pick “Labels”. The label settings page (“Einstellungen | Etiketten”) opens.
- Make sure the job label (“Auftragsetikett”) is selected at the top right of the card. There you can also switch to the product label (“Produktetikett”), a separate label for items from inventory management (from Team).
- Under label size and details (“Etikettengröße und Details”), enter your label size in height (“Höhe (mm)”) and width (“Breite (mm)”). One example is 33 × 57 mm. The preview on the left shows the size.
- Pick the orientation (“Orientierung”), for example landscape.
- Set the font size (“Schriftgröße”) and barcode height (“Barcode-Höhe”), and pick the barcode type (“Barcode-Typ”), for example Code 128.
- Under label content (“Etikettenbereich”), switch on or off the details you want on the label.
- Click the test print button at the top right (“Testdruck”) and check the label.
- If it looks right, click save (“Speichern”). RepairCMS confirms that the label settings were updated.
Details you can put on the label
Under label content, each detail has its own switch.
| Group | Switch (German label) |
|---|---|
| Codes | QR code for repair tracking (“QR-Code (RepairTracking)”), QR code for the job (“QR-Code (Job)”), barcode (“Barcode (EAN 128)”) |
| Job | job ID (“Auftrag-ID”), job type (“Auftragsart”), date (“Datum”), symptoms (“Symptome”), storage location (“Lagerplatz”) |
| Customer and device | customer name (“Kundenname”), model and manufacturer (“Modell, Hersteller”), password (“Passwort”) |
| Business | organization (“Organisation”) |
With the password switch on, RepairCMS prints the device password or PIN on the label. That helps when your technician needs to unlock the device for testing. Anyone who picks up the device can read the label, so only switch it on if you really need it at the bench.
A small label only fits a few details legibly. Start with job ID, customer name and one code, and check with a test print before you add more.
Step by step: print a label
- Click “Jobs” in the sidebar. The job list opens.
- In the job’s row, click the three-dot menu on the right.
- Pick “Print Label”.
- Your browser’s print dialog opens. Pick your label printer and print.
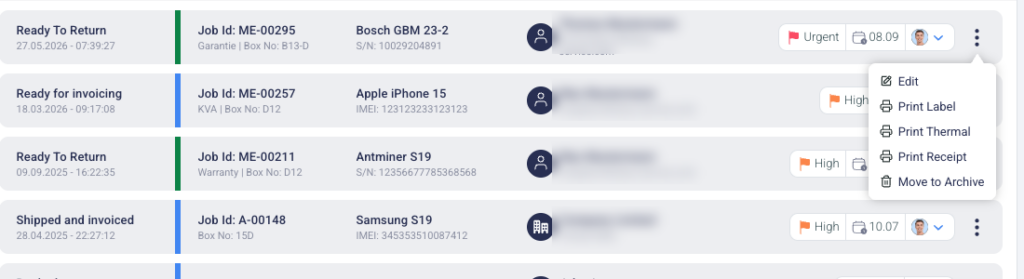
The same menu also has “Print Thermal” for receipt printers and “Print Receipt” for A4 documents of the job. You don’t need a separate driver setup in RepairCMS, as long as your browser can reach the printer.
If you use the B2B Partner Portal (add-on from Team), printing the label is a fixed step when your partners’ devices arrive. There you confirm with “Confirm arrival & print”.
Which label material to use
- For the job label during the repair, we recommend labels that peel off easily. Permanent or laminated labels are hard to remove without leaving residue.
- If a label should stay on the device for good, for example as an asset number, use polyester thermal transfer labels. They stand up to scratches, abrasion and chemicals, but need a printer with a ribbon. A direct thermal printer can’t print them.
Print labels from your phone
With the RepairCMS app you can also print job and device labels straight from your phone. The app comes with every plan. How to connect a label printer there is covered in the Mobile App help.
What’s next
- How to create a job is covered in the Organize Repair Orders category.
- You’ll find more basic settings in the Quick Start Guide.
Frequently Asked Questions
Where do I print the label for a job?
In the job list under “Jobs”. In the job's row, click the three-dot menu on the right and pick “Print Label”.
Which printer do I need for job labels?
A label printer your browser can reach. In the web app RepairCMS prints through the browser's print dialog, so no separate driver setup in RepairCMS is needed.
Which label size should I set?
The size of your labels in millimetres, as height and width. One example is 33 × 57 mm. A test print shows you straight away whether it fits.
Can I print the device password on the label?
Yes. Switch on the password switch (“Passwort”) under label content. Keep in mind that anyone can read the label.
Did this guide help you?