
Manage your plan and billing
On this page · 12 sections
You manage your RepairCMS subscription in the web app on the “Plans and Billing” page. You get there through “My RepairCMS” at the bottom of the sidebar and “Subscription”. There you upgrade or downgrade your plan and add users, locations and modules. Invoices and payment method live in the Stripe customer portal.
How to get to “Plans and Billing”
- In the web app, click “My RepairCMS” at the bottom left of the sidebar. A menu opens.
- Pick “Subscription”. The “Plans and Billing” page opens.
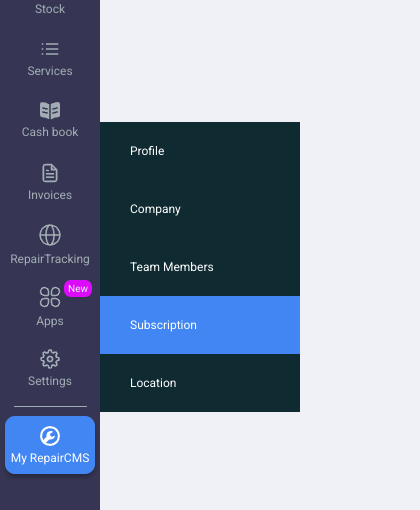
At the latest when your trial ends, you choose your plan here. It covers the web app and the RepairCMS app, and it’s active in the app straight away.
What you see on “Plans and Billing”
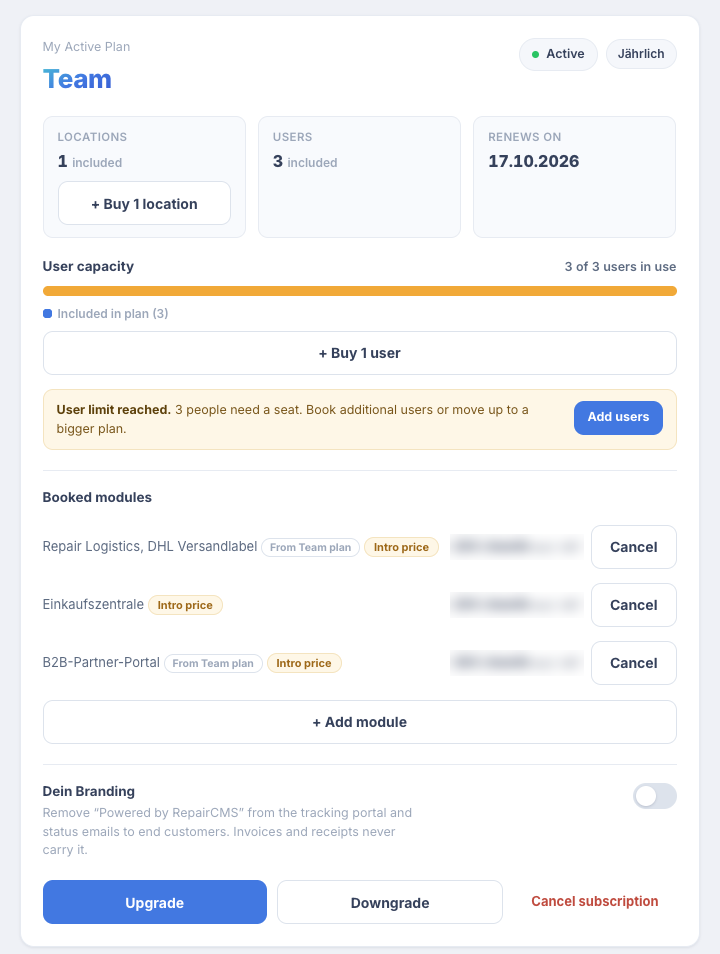
- “My Active Plan” with your plan name, its status, the billing cycle and the date it renews. It also shows how many locations and users are included.
- “User capacity” shows how many user seats are in use.
- “Booked modules” lists your modules, each with a “Cancel” button.
- Your branding removes “Powered by RepairCMS” from the tracking portal and the status emails to your customers. On paid plans, invoices and receipts never carry it. Removing it is available from the Team plan.
- “Invoices” and “Purchases”, more on those below.
All amounts are shown excluding VAT.
Change your plan
- Click “Upgrade” or “Downgrade”.
- Pick your plan. “Compare plans” shows what each plan includes.
- Under “Billing cycle”, pick “Monthly” or “Annual”.
- Check the “Order Overview” and click “Go to Checkout”. Payment runs through Stripe.
- RepairCMS shows “Thank you for your order” and sends you a confirmation email.
If your selection matches your current subscription, you can only continue once you change something. You don’t book Enterprise directly, it starts with an initial call.
Monthly or annual
- Annual: Plans come with a 10 percent annual discount. RepairCMS shows you what you save per year before you order.
- Monthly: All items are billed monthly and can be cancelled monthly.
Move to a smaller plan
With “Downgrade”, RepairCMS shows you what changes before you order:
- Modules that need a higher plan are disabled immediately when you switch.
- Paid additional locations are removed immediately when you switch, because they need the Team plan.
- Active apps the new plan doesn’t include are switched off. Your data is kept and comes back when you add the app again. “Keep it” adds a module straight to the order.
If you change your mind, click “Keep the … plan”.
Add users
Each plan includes a set number of users: Starter 1, Business 2, Team 3, Enterprise 3 per location. If you need more, you add users.
- Under “User capacity”, click “+ Buy 1 user”. When your limit is full, the button reads “Add users”.
- RepairCMS shows what’s charged today and when the user renews with your plan.
- Click “Buy now”. The user is added to your subscription and billed to your saved payment method.
Add locations
Additional locations are available from the Team plan. Click “+ Buy 1 location” on your current plan and then “Buy now”. The location is added to your subscription and billed to your saved payment method.
Book modules
- Under “Booked modules”, click “+ Add module” and pick the module.
- RepairCMS shows the price and what’s due today. You only pay for the rest of your current billing period, after which the module renews together with your plan.
- Click “Buy now”. RepairCMS confirms the booking.
While your plan is still in its trial, nothing is charged today. The first charge comes with your plan. Some modules need a certain plan, which is shown right on the module.
Invoices and payment method
Under “Invoices”, click “Manage billing and subscription”. You manage invoices, payment method and cancellation in the Stripe customer portal.
There’s a shorter way. As the account owner on a paid plan, click your name at the top right and pick “Billing” in the profile menu. The Stripe customer portal opens directly.
“Purchases” lists your orders from checkout, including one-time services such as an onboarding service.
If a payment fails
- When you book something, RepairCMS may show “Payment failed. Please check your payment method.” If your bank needs a confirmation, it says “Your card needs confirmation. Please update your payment method and try again.”
- If RepairCMS can’t collect your subscription payment, it pauses your access temporarily. Your data and settings stay safe. While your subscription is under warning, you can’t change or upgrade it.
Update your payment method in the Stripe customer portal through “Manage billing and subscription”. If you’ve already done that and still see the message, contact support.
Trial
The trial runs for 14 days. Once you’ve created your first repair order, you can extend it once with “Extend trial by 7 days”. When it has ended, pick a plan to keep going. Your data is kept.
When your team needs more
If a team member runs into a feature from a higher plan, they can ask you with “Request unlock”. You see the request under “Team requests” and click “Approve” or “Dismiss”.
What’s next
- How to cancel or undo a cancellation is covered in Cancel your subscription or undo it.
- You’ll find more account settings under Your Account.
Frequently Asked Questions
Where do I find my RepairCMS invoices?
In the Stripe customer portal. The quickest way there is to click your name at the top right and pick “Billing” in the profile menu. Alternatively, go to “My RepairCMS”, “Subscription” and under “Invoices” click “Manage billing and subscription”.
How do I change my payment method?
Also in the Stripe customer portal. Open it with “Billing” in the profile menu at the top right, or on “Plans and Billing” with “Manage billing and subscription”.
What happens to my data if I move to a smaller plan?
RepairCMS switches off apps the smaller plan doesn't include. Add them back later and the data is there again. Modules that need a higher plan are switched off when you change.
Can I extend my trial?
Yes, once by 7 days, as soon as you've created your first repair order. Click “Extend trial by 7 days”.
Did this guide help you?