
Set up multiple locations and assign team members
On this page · 7 sections
Your business takes in devices at one location, repairs them at another and hands them back at the first. To do this, you add the second location, assign each team member to their location and give the team members at the repair location the “Cross-Location Job Access” permission. The job stays at the drop-off location, and the physical location shows where the device is right now.
The example in this article has two locations, Hauptwerkstatt and Filiale Nord. Lea takes in coffee machines at Hauptwerkstatt, and Tom repairs them at Filiale Nord.
Requirement
Only the account owner sees the “Location” and “Team Members” menu items. Additional locations are included in the RepairCMS Team and Enterprise plans. The RepairCMS Enterprise plan includes 3 users per location, and you can add more users. How to change your plan and add locations is explained in the article on your plan and billing.
Add a location
Your first location already exists. It’s called the Default Location, shows the note “Synced with the company address” and has no edit menu. In the example that’s Hauptwerkstatt, so the location you add is Filiale Nord.
- In the sidebar, open “My RepairCMS” and click “Location”. The page is titled “Settings | Locations” and lists all locations with their Location ID, Location Prefix and address.
- Click the blue plus at the top right. If you’ve reached your plan’s limit, the “Buy 1 more location” dialog with the “Buy now” button comes first.
- Enter the name in the “Location Name” field, “Filiale Nord” in the example.
- Add the address, email, phone number and opening hours. The email is a required field.
- Save the location.

Set up the location
You set the prefix and the switches on each additional location. You reach them when you add the location, or later through the location’s three-dot menu and “Edit Location”.
Location prefix
The prefix gives the job numbers of a location their own short code. It has up to 3 characters, so Filiale Nord could get “FN”. The field is labelled “Location Pefix” in the form. The Location ID next to it is fixed and can’t be changed.

The switches
Three switches apply to all team members assigned to this location. When a switch is on, they can filter the lists by location, and the global search shows them results from all locations.
- Access to all contacts applies to contacts.
- Access To All Services & Stocks applies to services and stock.
- Access To All Jobs & Invoices applies to the job and invoice lists and to searching for invoices.
The fourth switch does something else. With E-Commerce SEND-IN Location you decide that devices are sent to this location.

The checkbox and the switches do different things. The “Cross-Location Job Access” checkbox belongs to a single team member and shows them the jobs of all locations in the job overview. The switches belong to a location and apply to filters and search for all team members at that location. For Tom to see the jobs from Hauptwerkstatt, you tick the checkbox on Tom.
Assign team members
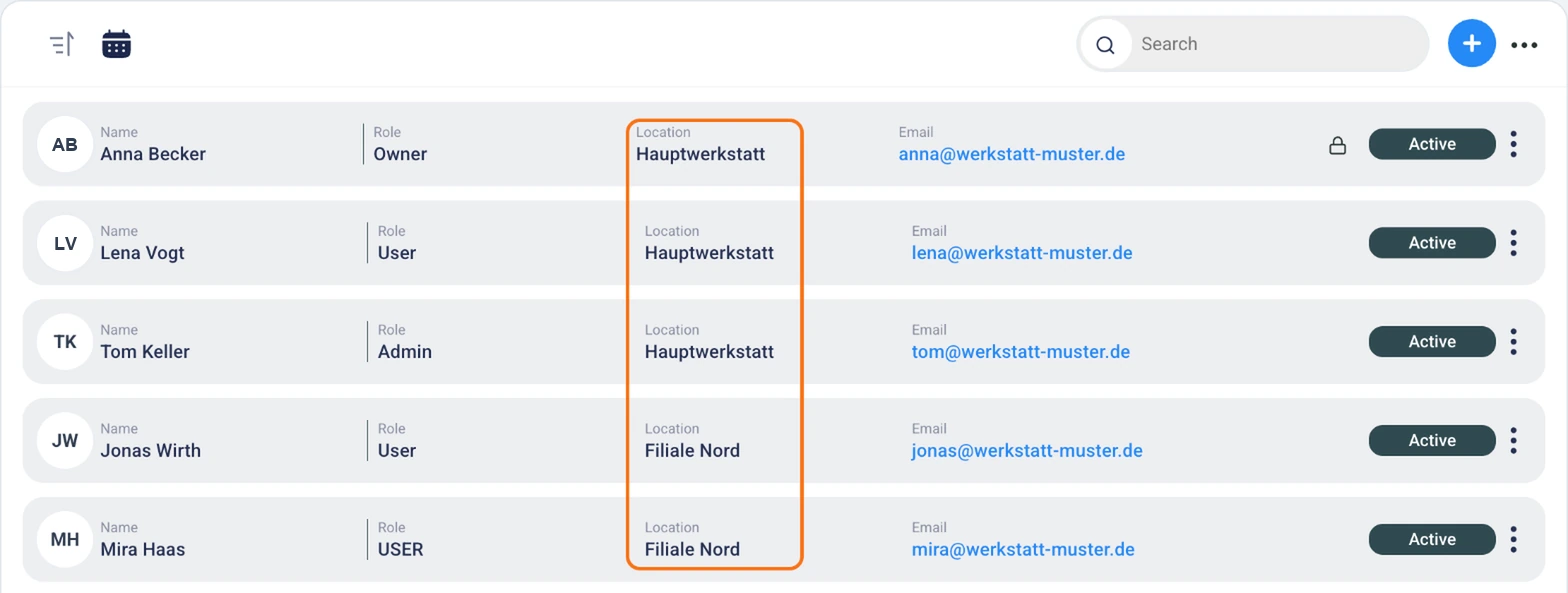
Every team member belongs to exactly one location. That decides which jobs they see and which location their new jobs are assigned to.
- In the sidebar, open “My RepairCMS” and click “Team Members”.
- Add a new user with the blue plus, or choose “Edit User” in the three-dot menu of an existing user.
- Pick the location in the required “Location” field, Filiale Nord for Tom and Hauptwerkstatt for Lea in the example.
- Under “Roles & Rights”, pick the role. This is a required field too.
- Save the user.

Give the “Cross-Location Job Access” permission
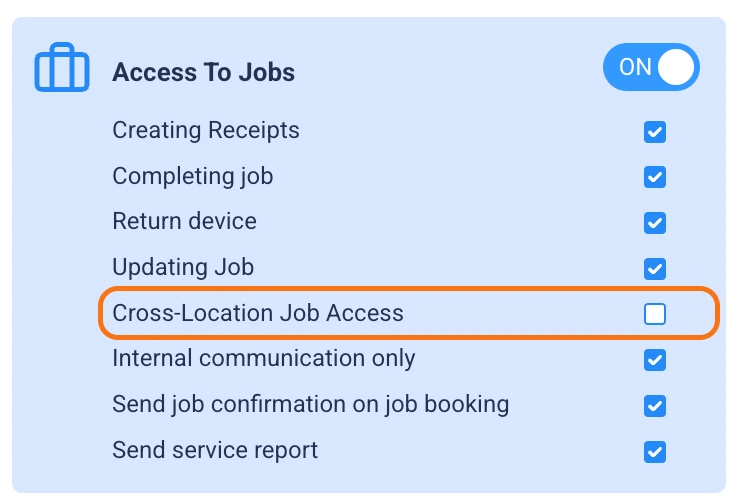
Without this permission, a team member sees the jobs of their own location in the job overview. Lea doesn’t need the checkbox in the example, because the jobs belong to her location. Tom does, because he works on jobs from Hauptwerkstatt. As the owner, you see the jobs of all locations without the checkbox.
- Open “Edit User” in Tom’s three-dot menu.
- Turn on “Access To Jobs”.
- Inside it, tick “Cross-Location Job Access”.
- Save the user.
What else you can allow your team members to do is explained in the article on user permissions.
How a job moves between two locations
- A customer drops off their coffee machine at Hauptwerkstatt, and Lea books the job. RepairCMS assigns it to the Hauptwerkstatt location, because Lea belongs to that location.
- Lea sends the device to Filiale Nord and enters the new physical location on the job, for example “Filiale Nord, shelf 2”.
- Tom finds the job in his job overview and repairs the device.
- Tom sends the device back and enters a physical location such as “Hauptwerkstatt, pickup”.
- The customer picks up their device at Hauptwerkstatt.
You change the physical location at the top of the job, where the field is called “Box Location”. Click the pencil next to it, enter the new place and click outside the field.
The job stays at the Hauptwerkstatt location the whole time, because RepairCMS has no function that moves it to another location. The physical location shows where the device is right now.
The invoice belongs to the location where you issue it. If Lea issues it at pickup, that’s Hauptwerkstatt.
Always put the location at the start of the physical location. Then Lea can see right away where the device is when the customer asks about their repair.
Frequently Asked Questions
Why can't my team member see the jobs from the other location?
They're probably missing the “Cross-Location Job Access” permission. You set it under “Team Members” in “Edit User”, as a checkbox inside the “Access To Jobs” switch. With it, they see the jobs of all locations in the job overview.
What's the difference between the checkbox on the team member and the switches on the location?
The “Cross-Location Job Access” checkbox shows a single team member the jobs of all locations. The switches on a location apply to filters and search for all team members at that location.
Can I pass a job on to another location?
Team members with the “Cross-Location Job Access” permission work directly on the job, whichever location it was booked at. The job itself stays at its location and can't be moved. You record where the device is right now as the physical location on the job.
Which location does a new job belong to?
The location of the team member who books it. If Tom at Filiale Nord books a device himself, the job belongs to the Filiale Nord location.
Can a team member work at two locations?
With the “Cross-Location Job Access” permission, a team member sees the jobs of all locations. They are still assigned to exactly one location, and the jobs they book themselves belong there.
Can I use two prefixes at one location?
Each branch gets its own prefix through its own location. If you need two prefixes, you add two locations and assign your users to them. Two prefixes within one location aren't possible.
Why can't I edit my first location?
Your first location is the Default Location. It's synced with your company address, so it has no edit menu.
Does this also apply in the RepairCMS app?
Yes, the RepairCMS app works the same way. With the “Cross-Location Job Access” permission, a team member sees and searches the jobs of all locations there, and without it the jobs of their own location.
Did this guide help you?